
Assalamualaikum semua. Salam pembuka bicara.
So hows Ramadhan been treating you? dah masuk 10 hari terakhir ni marilah kia tingkatkan ibadah k. Mana tahu rezeki tahun ni dapat bertemu Lailatul qadr. Aminnnn
Anywayssss, this entry is actually to show you guys how to DIY your own wedding veil! haa menarik ke idok. Hahaha. Sebab nya kite dulu buat sendiri je veil nikah & sanding, and memang tahap penjimatan level 99999. I'll be showing you guys a complete step-by-step on how to make your own wedding veil. Aku rasa yang paling tak pandai & tak pernah DIY pun boleh try, sebab senang sangat. But bear in mind, the types that ill be showing you guys are the ones that are reallyyy simple, with no beads and all, make sure you add it on your own afterwards if its too simple for your occasion :)
My Nikah Veil


Sorry i dont have a proper picture of the veil. Hope these help. TT
1. The stuffs you need
i. Kain chiffon/ net
I got these both from Jakel store. I used light chiffon for my nikah's veil (just ask the promoter which kain people usually buy to make veil) and net for my sanding veil.
ii. Lace strips
Bought from some random craft store
iii. Benang & Jarum
iv. Measuring tape
v. A pair of scissors
vi. A mirror
Okay all of the above i must say are essentials in making ones veil. Make sure you have everything nearby!
2. Measure yourself
Before anything else starts, you must first measure yourself. Hehe. Because i did this on my own so i measure myself. Orang cakap ukur baju dibadan sendiri? hahaha takpe sekali ni je.

From the picture above, you can tell how long you want your veil to be. Basically there are many length options for wedding veils, moreover in the western culture. But i just wanna keep it simple and not too long. So after much 'googling' done, ive made myself clear that i just want a short in length veil. Yeay! so the picture above generally describes my length of veil for nikah. Ive chosen type B, which is slight less than elbow level.
3. Measure and cut the material

The next step would be transferring the measurement taken onto your material.
So as the picture tells, your measurement from sides of your arm (left to right, vice versa) would be the A. Carefully cut the material following the A.
Then measure the center-point of the A, which would be the B (as the pic suggests).
Make a curve cut (like the pic suggests). I just cut it freely (you can draw a curve first using chalk).
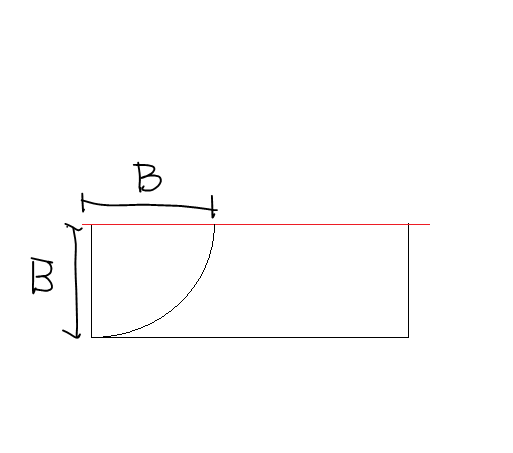
However, if you want it to be easier, fold the material in half, and cut a half moon shape (like the pic suggests).
Then you basically have a half-moon-shape veil. Yeay! But first you must send it to 'jahit tepi' first so that the end would not split.
4. Putting appliques/lace strips
Basically, this step is kind of easy. Cuz you just need to sew the lace from end to end. And then, pomm! Its ready
My Reception veil

Sorry i dont have a proper picture of the veil. Hope this helps. TT
1. The stuffs you need
Refer to no #1 above.
I have used net for this type of veil. Because i want it to be a lil bit different size from my nikah veil, so the steps below just to show the measurement.
2. Measure and cut the material

Indicator --> 2.5 metres from left to right in the picture above.
As the picture suggest, get a longer length of material and fold it in half.
For my veil, i bought 2.5 metres of net (berangan nak jadi princess kononnya. Hahaha) so that it would be longer (long enough it almost reach the floor)

After folding it in half, cut the material (following the red line). Make sure the red line (the line that you want to cut) is at the meeting end. So you get a half moon end.
3. Sewing

Open the cut material.
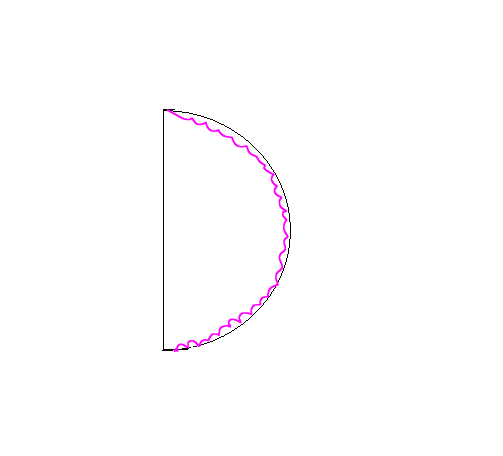
Because i want the veil to be in two layers, i sew right in the middle of the material. I measure irregular length (so that the upper layer is shorter that the bottom layer) (follow the picture below).
Just simply sew it (orang melayu cakap jahit jelujur) we just want the crinkle effects afterwards (see following photo).

When you finish sewing, fold the veil in half again (like in the picture above)

Pull one of the string end (like in the pic above). Pull until the crinkle shown as above. then pomm! Siap. Hahaha
Basically this type of net veil is just to put it on top of your bun with some pins and you are literally done :') Mine i dont put anything on the veil, i just love it plain. Hehe.
Okay. Hope this entry helps you guys in one way or another. Cuz for me it is super easy to follow. :)
p/s: Steps given memang cincai habis. Please do not condemn my style of DIY ing things. I like it this way cos i want to have things that are pretty but not hurting my pocket. Hahaha
Thanks for reading this long entry! :)
.
No comments:
Post a Comment